Wednesday, June 29, 2011

How to change the line color of a digital image tutorial.

How to change the line colour of a digital image - tutorial.

1.Insert your picture into you software program – I am using Microsoft Word 2007 and for this tutorial and I am using the border from The Crafty Pad Designs - Butterfly and Verse set.

2. Place the mouse cursor over the picture and right click.  This will bring up a side toolbar as shown in picture 1.  Click on the ‘FORMAT’ option as red circle highlighted in picture 1.

3. This will then display the formatting toolbox as shown in picture 2.  From the selection menu on the left, select ‘PICTURE’ and left mouse click to show the editing toolbar as shown in Picture 2.  

4. Select the colour you would like from the selections under the ‘LIGHT VARIATIONS’ – this will change the line colour to the colour you have chosen.  The ‘Dark Variations’ selections will change the background, white space and the image to the chosen colour.  As you can see in Picture 3, I have chosen to change my image lines to red. 

5. You can also manually adjust the colour of the lines more by adjusting the settings on the brightness and contrast settings using the arrows.  As you can see in picture 4 my image is now a more vibrate red. 

6. Once you have your preferred colour, ‘CLOSE’ the dialog box and you are ready to re-size and print your image. 

Don't forget there is still heaps of time to play along in this weeks challenge 
Bright and Bold or Soft Pastels at 
 We would love to see you, so please drop by and play along with us this week


Wall Hanging Birthday Pressie for my Mum

On a roll with 4 :)

For anyone familiar with my work, or if you have a peaksie around my blog you will find that I am no stranger to ripping, tearing and distressing it up!  In fact, I find it very easy to take a gorgeous piece of paper and be able to do anything to it!  And I love my paper! In most cases paper picks me and the project it is going to be.  A lot of my inspiration comes from the paper(s) I am working with.
Well ... I finally met my match!

I started with a plan for what WAS meant to be a card and it WAS meant to have several layers all over lapping each other. But, when I cut my base layer, my first piece, I just could not cover up such a gorgeous piece of paper. I could not do it! I could not rip it, I could not even distress the edges! And as for taking a needle to it I had to force myself! Oh Dear this was not a good start!

I had brought these papers especially for my Mums birthday card and I have a lot of favorite sentiments in mind for her.  I love walking into mums house so much now days, as every card I have given her is placed somewhere around the house on display.  So I thought I would take my problem and construct it into a wall hanging and I also would get the opportunity to combine several sentiments at the one time (excellent I say as I was struggling to just pick one for her!)  :))  I kept the majority of the focus pieces of the paper uncovered and emphasized the journal like pages by also printing my sentiments on the same DP, lining up the lines I will admit did get a little tricky but the end result is just smashing! 

Want to have a peak at what I am raving about???

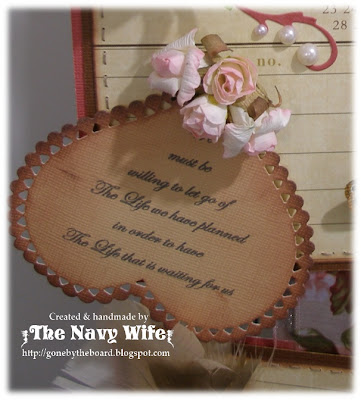
The sentiment says - We must be willing to let go of the Life we have planned, in order to have the Life we have waiting for us. 

I thought this was perfect for the current situation of the sudden divorce she is going through at the moment.
Close up of the Shimmer Mist added to both butterflies and the stamp on the paper.
 Sentiment says - When you think of wonderful things, Don't forget to think of yourself.

Sentiment says - Remember if you're headed in the wrong direction, God allows U-turns.

Sentiment Says - You are Amazing just the way you are. 
So this paper! If anyone is interested is Webster's Pages - Your Life. Beautiful  - Nature's storybook, Nature's Manuscript (US1704D) and all my sentiments are freebies from the lovely Ginger at Ginger's House.  Though for the 1st sentiment I have taken her words and made my own in Word as the original did not fit on the heart like I wanted.  

I also have had to go back and stash up on this paper (another 15 sheets of it lol) as I so did not want to part with this little creation after I made it and my sister saw this as well before I gave it to mum and had that look of "Oh I want one too", so I can see at least another two of these in the near future :)  Hope you like it as much as much as me.  Mum was wrapped with it and has proudly displayed it off her mirror (as you can see from the pics) so she sees it every morning as she gets ready for the day :)

Thank you for dropping in on me,
and I hope you like what you see!


Challenges this creation is entering with the help of the Feline Playful Girls:
Deep Ocean Challenge - Flowers (-)
Digital Tuesday Challenge - Flower Power (-)
Going Grey With Scrap Creations - Anything but a card (1/2)
Hooked on Crafts - Flowers (-)
Oh La La Creations - Summer Flowers (-)
The Shabby Tea Room - My Favorite Things - Paper, flowers, butterflies, my mum (-)
Simon Says Stamp and Show - A Word (-)
Creative Inspiration - Stitching (-)
Dream Valley Challenges - Ribbon (1/3)
Craft Your Days Away - Vintage (-)
Marks Finest Paper - Make it sparkle (-)
Sugar Creek Hollow - Tic Tac Toe - Glitter (shimmer mist), pearls and flowers (2/3)
The Stamp Man - Butterflies & dragon flies (1/1)
Crafty Purple Frog - Pearls and swirls (-)
Flutter By Wednesday - Open Challenge (-)
The Paper Shelter - Anything Goes (1/3)
- - - - - - - - - - - - - -

How to CROP Digital Images Tutorial !

How to CROP Digital Images Tutorial !

If you are somewhat new to the world of digital stamps as I am you may find this extremely handy.  I know I've wasted a lot of paper, card and ink on sheet images trying to get them to print at the size I want and I have printed many of the extra unwanted images on the sheet as I did not know how to ‘remove’ them from the printing selection.  So I thought I would share with you a handy little ‘know how’ that my brother so kindly showed me how to do. 

1. Open a new blank document in your Office Word program (I am using Microsoft Office Word 2007).
2. Left mouse ‘click’ on the ‘INSERT TAB’ along the top toolbar. (Red circle highlighted in Picture 1)
3. Then left mouse ‘click’ on the ‘PICTURE’ tab in the toolbar. (Red circle highlighted in Picture 1)) This will open a dialog box that you can select your picture from. 
 4. Select the digital image or sheet you wish to use and left mouse click on ‘INSERT’ (red circle highlighted in Picture 1).  For this tutorial I am going to use The Crafty Pad Designs - Butterfly and Verse set.

5. Once your picture is imported it should automatically bring up the ‘FORMAT PICTURE’ tool bar in your menu bar along the top of the screen. (If this doesn’t happen, left mouse ‘click’ on the image so the blue box appears around the image and then you will be in the correct editing TAB).
6. To crop your image you need to left mouse ‘click’ on the ‘CROP’ tab in the toolbar. (Red circle highlighted in Picture 2).  This will bring up the BOLD BLACK alignment marks around your image sheet as I have highlighted with green circles in picture 2.    
7. The butterfly in the bottom right corner that I have circle highlighted in picture 2 is the image we are going to ‘single out’ of the sheet and use.
8. Place your mouse over one of the BOLD MARKS, left mouse ‘click’ on it and hold the mouse button in and move your mouse.  This should be cropping the image in or out depending on the direction you are moving the mouse. In picture 3 I have started to move the bottom left bold mark in and you can notice the left side of the original image has disappeared.  Do this with all the marks until you have cropped the image to your need.  You may move and crop with all the bold marks; you are not limited to only using the corner marks. 
9. Picture 4 shows the finished single cropped image. Now ready for me to re-size or use as it is. 

You can also use this technique on single digital images if they have a lot of white wasted space around them in their original image.  I often use this now when I am working with my small die cuts and want to get as big a image as I can.  
 

I hope you find this as handy and waste saving as I have.

***EDIT** I meant to post this last week but being sick and all totally forgot :$ 
I have got the next in this series ready to go for tonight though :))

My mums Birthday Card - specially from me

Another card to share :-)

This one is another Birthday card I made specially for mum, from me, and I used another sentiment freebie from Gingers House.  This would have to be my favorite sentiment in all my stash. And as mum proudly displays all her cards, I thought this would be lovely to look at and sure to bring a smile to her face as she walks around doing her thing.

 Forgive the camera flash to show the glimmer mist sparkle.
I love this flower! I am still addicted to making them lol and I really love the effect of distressing the petals and adding the large glitter flecks and laying them on the wood fiber shavings, so I went with that style again.  I popped some posh pins that I made from leftover beads laying around the house behind the flower to also give a little more 'bling'.  The butterfly is a rubber stamp from my stash that I have dimensioned up and added some pearls to and this may shock you but I used my first ever Tim Holtz product (a distress ink) to stamp it in.  Yes I know! shocking!! but other than this recent new purchase I do not own any Tim Holtz stuff! (that is mighty about to change though now!)

I finished the card with a pritz of clear shimmer glimmer mist and I could not capture the feathers on camera but they have a lovely sparkly shine to them and look just delicious!  I could so have kept this card for myself too! but that just gives me an excuse to make another one just for me :)

Thank you for dropping in on me,
and I hope you like what you see!


Challenges this creation is entering with the help of the Feline Playful Girls:
Deep Ocean Challenge - Flowers (-)
Digital Tuesday Challenge - Flower Power (-)
Digi Design House - Handmade flowers (-)
Hooked on Crafts - Flowers (-)
Oh La La Creations - Summer Flowers (-)
The Shabby Tea Room - My Favorite Things - Paper, flowers, butterflies, feathers my mum (-)
Simon Says Stamp and Show - A Word (-)
Gingerloft Challenges - Beads - posh pins (-)
Craft Your Days Away - Vintage (-)
Marks Finest Paper - Make it sparkle (-)
Sugar Creek Hollow - Tic Tac Toe - Glitter (shimmer mist), pearls and flowers (1/3)
Art Impressions - Handmade flowers (1/1 & *)
- - - - - - - -

A blushing 21st Birthday Card

2nd post for the day ... Hmmm 
I can now understand why my desk is such a mess!

I was asked by a friend of my mums if I could make her a card for her nephews 21st Birthday.  Gladly, of-course I accepted!  All she could give me to go on was boy, 21st and he is a bit of a computer geek/nerd.  I have been wanting to try something a little 'oh la la naughty' and being that the recipient is a little computer geeky, the Computer Nanny web message when the kids are trying to view something they shouldn't just kept coming to my mind. So... I just had to make the jump and get me a Kenny K digital download and  Carmen Electrafying  I thought was perfect for the naughty Oh La La girl!

I have also stepped outside of my box a little with this one and I colored Carmen digitally in Paint.Net (a free paint-shop program that I do all my editing in).  I am really wrapped with how well she turned out and I have given her a coat of dimensional magic to give her the more real life appearance. 

I do admit I did blush a little with this one, especially as Chloe all day long kept on pointing at Carmen and saying 'Oh look mummy, wow mummy your pr-e-tt-y!'.  <---- Yeah right! maybe 15 years ago pre children!  Still it was a great little boost to my confidence and did bring smiles all day long  lol.  Carmen also reminds me a lot of my little Miss Chloe, although she is only 3, she is a girl who already knows the power of being a woman and what she can get with it by flashing her smile and batting her eyelids!  Personalities are amazing even it that age!  Lucky I will always have my little Miss Emilie as the innocent child *mummys girl*

 The front.

 When you open the card. 

 Image close up.

 When you lift the image flap.

When the card is standing on show.

I love the grunge distressed papers I used (will have to get more of it!) as it worked so well with the image.  I added some buttons with twine knots on the front and I just love the chain so much I really wanted to work it in the embellishments as well as the image.  Being a 21st I could not resist not adding the key charm on the chain and adding it to her hand.  Makes me nervous just thinking of trying to grab it from her hehehe :)  

I can not wait to send this image to Ben in a card!  And I know a few other men friends who are sure to blush with major grins on their face when they see her.  Carmen doesn't strike me as a women who would tire easily but I am sure going to try and wear her out a little *naughty me*.

Thank you for dropping in on me,
and I hope you like what you see!


Challenges this creation is entering with the help of the Feline Playful Girls:
Top Tip Tuesday - Something beginning with "T" - Twine / tease / Twenty-One (1/3) **EDIT Made Top 3
The Crazy Challenge - Beautiful Women (1/2) ***EDIT made top 3
Stamps R Us - There was a little girl - WAS being the keyword (1/2)
Card Cupids - Cards for Boys (-)
Crafty Catz - Add a charm - The key (1/1) 
Pixie Dust Studio - Use a number or gears - 21st (-)
The Sisterhood of Crafters -  Masculine Birthday/Anniversary (1/3)
- - - - - - - - -

For a Good Time .... Call 1800 - Crazy Nana!

Happy Hump Day Everyone!
I have a few posts to get up today, from the last two weeks that I have not had to time to sit and blog.  First up I have a Birthday card I made for my mum that is specially from the kids.  They have only recently started having sleep overs and they have so far all been a success so I thought this sentiment (freebie from Gingers House with some home editing done to it) was perfect for the occasion.  And yes, my kids call my mum Crazy Nanny!  It is quite a classic running into her in the shops and the kids start yelling Crazy Nanny! Crazy Nanny over here! Everyone stops and stares pmsl!


 This card was great for using up some scraps and the flower is one from a bargain shopping spree that I did at the local opportunity shops a while back and snagged for just 50 cents.  I pulled it all apart and replaced the tacky plastic middle with a gorgeous vintage brad (bad photo angle but you can see it when the card is standing on display) and I carried the pearls though by adding the 3 along the bottom.  I added some stitching around the edges and a little ink distressing on the paper edges.
Love how well it finished up!
Thank you for dropping in on me,
and I hope you like what you see!


Challenges this creation is entering with the help of the Feline Playful Girls:
Clear It Out - Clean and Simple (-)
Deep Ocean Challenge - Flowers (-)
Digital Tuesday Challenge - Flower Power (-)
Shopping Our Stash - Scrap attack or recycle - Used scraps and recycles flower (- / C10)
Hooked on Crafts - Flowers (-)
Oh La La Creations - Summer Flowers (-)
Creative Inspiration - Stitching (-)
Little Claire's - Pink and Brown (1/3)
- - - - - - - - - - - - - 

Tuesday, June 28, 2011

GDT Anything Goes Challenge Blog - The Letter D

Terrific Tuesday to you all! 

Today I have my last Guest Design Team card with 

It has been great fun playing along with the girls this month 
and I must say a huge thanks for having me! 

Sad things aside though ... This fortnights challenge is ... 

The Letter D!

D - Dream and Distress are the first things that come to mind for me so that is the direction I headed in :) and I have used a sentiment from again the lovely Ginger at Gingers House.


As I really wanted to show the Distress in the card stock I went with a CoreDimension piece for this card and gave it a generous sanding.  The flowers are handmade and the edges have been distressed with inks and white acrylic paint.  I also used the white acrylic paint to distress the edges of the sentiment and the corrugated green cardstock.  I found some vintage lace while rumbling through my stash and thought it would match perfectly to finish the card.  I kept all the embellishments fairly simple this week as I also wanted to have this in my stash for a unisex card if I need one.  I love how textured the whole end result came up and am really happy with this card today! 

This week there is an awesome prize up for grabs, 
for all the details please check out the 
 

Again I have to say HUGE THANKS to the girls at 
for having me, it was a blast playing along with you all!

Thank you for dropping in on me,
and I hope you will join us this week and take up the challenge!
Challenges this creation is entering with the help of the Feline Playful Girls:
Art Impressions Stamps - Handmade Flowers (1/1 & *)
Rainbow Lady's - Use a digi (1/2)
The Spotlight Challenge - Focus on Sentiment
Digi Design House - Handmade flowers (1/-)
Simon Says Stamp and Show - A Word (1/-)


Sunday, June 26, 2011

Bold & Bright or Soft Pastels with TCP

Super Sunday to you all! 

Thankfully I am finally feeling better after my 3 little terrorists brought home a super bug that knocked us all down for the week.  They all got a good dose of it as well so I was somewhat lucky as I would never have been able to keep with them otherwise.  We spent most of the week laying like stunned mullets on the mattress in front of the TV watching DVD's and even that seemed to drain energy.

I did find a moment to make my card for this weeks challenge at 
And this week we would love to see 
Bright and Bold
or Soft Pastels

I went with the pastels for this challenge as Bright & Bold I was not feeling at all, and if anything I was ... a little green :)
Here is where my craftiness went this week.
Hope you like it. 


I am really proud I managed to pull of a male card this week - I find them such a challenge most of the time to be honest, and I just love this layout and how smoothly all my elements just seemed to work together with each other.  I added lots of faux stitching my white and green gel pens and I just could not resist wrapping some kitchen twine up for the lasso rope (even though it was a little fiddly), I think it completed the card.  I also dipped into my button jar, added some sparkle with the blue stars and my embroidery threads seem to be laying dormant these days as well so I went peaking in that box for the metallic copper thread wrapped around one of the layers.  


The image is the adorable Bradly with Toy Horse from The Crafty Pad Designs.  Bradly is recently new in store and can be brought separately or brought in a set with the mini Birthday story book (an excellent set of images and a great personalized gift idea). You can see a completed book HERE on The Crafty Pad Challenge Blog that Lorraine so crafting-ly made


This week we also have a fab sponsor!

Crafty Emma's Store has so kindly given us this set of Dovecraft Sugar and Spice stamps for one lucky winner!  Aren't those flowers just adorable!

The girls and I at The Crafty Pad would love if you played along with us this week and with such a gorgeous prize up for grabs I know you will be penciling this challenge into the diary of things to do this week, So let us see you there!


Thank you for dropping in on me,
and I hope you will join us this week and take up the challenge!
Challenges this creation is entering with the help of the Feline Playful Girls:
Soartful Challenges - Inspiration Pic - Sunset Cowboy
Totally PaperCrafts - Spots & Stripes
Crafty Sentiments Designs - Monochromatic (1/1)
Pals Paper Arts - Stars (on DP and star embellishments) (1/-)
Paper Play - Stars & Stripes ( 1/2)
Shelly's Images - Stars and Stripes or patriotic (1/-)
Tuesday Throwdown -Masculine Card (1/-)
Cards For Men - Stars  (-)
Creative Stamp Friends - Birthdays (-)
Daisy Doodles - Stars and Stripes  (1/2)
Blog-a-Doodle - Masculine and no flowers (-)
- - - - - - - - - - -