Friday, November 30, 2012

Spellbinders Explore Beyond Challenge!

Good Mornings all :) 

Waiting for me in my inbox this morning was a lovely newsletter from the gorgeous folks at Spellbinders!  I always get a little excited when I get their emails. And wow!  Am I excited! 

Have you checked out the 
No ??? My goodness, this just will not do!
Get your gorgeous booty over there and check this out {HERE}!

Still here ? 
Maybe this will get your tail moving .... 
There is a $5,000 Grand Prize Package 
from Spellbinders and cross promotional partners!

Oh yeah! .... There you go! lol 

 Anyways, Guess you can tell what got me and Mojo inspired today :)
So photos ... here we go!

 Okies,  I got side tracked again! 
This started as a card and then I had this bright brainwave to throw in a matching box as well :$  *hey you know me, this stuff happens lol* 

 Close up the card! - Yummy Graphic 45 papers from the Playtimes Past Collection.
*Yes I raided my stash of precious papers*

 Side view - All the layers have been popped up on pop dots.
And I went the distance and did the inside the same too!

 The train charm I pulled from my stash and I used the Spellbinders Floral Flourish with some tricky cutting to make the smoke from the trains chimney.  I used Core'dinations and with some sanding, tried for a black / white smokey look.

 Close up of the box. - I followed the same layout design as the card. 
Inside is a little chocolate nestled among some fluffy wool.

 Box - Side view.


Okies, being honest, 
I don't think I stand a chance in a blue moon of winning this competition 
but I had to give it a try as without an entry, 
well, I really don't stand a chance at all then! 

My Spellbinders stash has been growing of late and for this set I pulled out my new Fleur De Lis Squares, Large and Small Squares and the Floral Flourish.  The Graphic 45- Playtimes past papers matched beautifully with the ribbon I got from my Really Reasonable Ribbon - ribbon club and the train charm has been sitting in the draw for a long while now that I should stop hording it!  The pearls are from Flourish With a Bling. 

 I really enjoyed today just sitting and creating , 
so much so, that I think I might just be able to squeeze 
in another creation this afternoon! 

Thanks for calling past to see me :)

Recipe -
Paper(s) -   Graphic 45 - Playtimes past collection
Tools -  Spellbinders - Fleur De Lis Squares, Large and Small Squares and the Floral Flourish
Embellishment(s) -Really Reasonable Ribbon - ribbon club, Flourish with a bling pearls, Stampin' Up Antique brads, Train Charm from stash. 
Challenges this creation is entering with the help of the Feline Playful Girls:
Card Crafter's Circle - Bearing Gifts Fri  E1/3 C10
 Crafts And Me - Ribbon / trim Wed
Creative Moments - Anything Goes Wed 
Simon Says Stamp - Anything Goes  Wed
 Papertake Weekly - Free For All Tues
 - - - - - - - -

Tuesday, November 27, 2012

Clean and Simple @ Inpsired Stamps

Good Mornings all :)

I'm sailing in today with an
creation!

I can not tell a lie ...
I was greatly challenged this week!
As Antoinette asked us to try our hands at some Clean & Simple cards!
And if possible make a set! 

You hyperventilating ?
I can tell you now, I WAS hyperventilating
Just thinking about this challenge!

I had about 4 attempts at this "Clean and Simple thing" until I finally settled on a design that I liked, that also worked with the challenge and was something that I was not going back to go back to afterwards and add more to.

And this is where Mr Mojo and I ended up :)
I am very impressed with how well these turned out! 
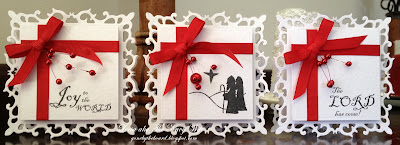
And I think they are quiet striking as a set all together.

Close up of Card #1. 

Close up of Card #2.

Close up of Card #3.

And back at the set together! 

This set started with the Joy to the world scripture from the Vintage Christmas set available from Inspired stamps.  I did my best to keep the embellishments minimal by only adding the touches of ribbon, bow and some red pearl sprays.  I then mounted it all on some pop dots and placed them on a base cut from the largest of the spellbinders Fleur De Lis Squares.

 I fell in love with the first one, so I continued on using the The Lord has come sentiment, also from the Vintage Christmas set. I tried to change the color of the ribbon around, but I loved the red and white combo and kinda got it stuck in my head.  

For the third card in the set I combined the shepherds silhouette and the star, also from the Vintage Christmas set.  And again, followed the same line as the previous for the embellishments. 

I have absolutely fallen in love with this set! 
And I know they were orginally meant to be cards ... 
But all together they tell a lovely story
So I have popped them up on my buffet to use a display instead :$ 
I have also been privy to have a sneak peak at what the other girls have been up too! 
And they have some gorgeous cards to share with you too!  
So don't forger to stop on by the 

Thank you for stopping into see me today and sharing my Inspired Stamps creation with you!
I look forward to sharing another with you next Tuesday :) 
Happy Crafting till then! 

Recipe -
Paper(s) -   Hammed white cardstock
Tools - Spellbinders - Fleur De Lis Sqaures
Embellishment(s) -Ribbon, red pearl spray


Challenges this creation is entering with the help of the Feline Playful Girls:
Crimbo Crackers - #29 Anything goes Thurs 
Crafty Ribbons - Two ribbons Thurs 
Aud Sentiments - Bingo - Ribbon, joy & die cut Thurs
Word Art Wednesday - Encouraging / Uplifting Sentiment Wed E1/5
My Mums Craft Shop - #85 Inspired By a Song (Joy to the world) Wed
Whimsy stamps Challenge - #53 Traditional Christmas Colors Wed E1/3
Addicted To Stamps - #44 Christmas Time  Sun
Stampin' Sisters In Christ - Christmas Cards Sun
Less is More - #95 Glamour & Glitz Sat
Jackson's Digital Expressions - Black White & Red Tues
- - - - - - - - -

Monday, November 26, 2012

Scrap War; Create Peace - Mojovation Challenge

Marvelous Mondays folks :) 

Today I am playing along to the 

Being held by the gorgeous Corinne over at
You need to peak in her shop! 
She has delicious goodies!
And she ships ... EVERYWHERE in the WORLD

AND FOR JUST PLAYING ALONG
Corinne is GIVING yes GIVING !!!!!
each entrant a $5 voucher! 
to spend on anything they want from her shop 

You don't need a better excuse to play along than that do you ? 
So head on over to Handmade Halo on Facebook {HERE
for all the details! 

I was going to make a card for this challenge, 
was even going to go white on white! OMG! 
But ... 
I got side tracked lol 
and I have ended up with a tag :) 

Peace for me would have to include Christmas.  As it the one day of the year that as a family, all grievances are put aside and we all come together as one.  (And yes, this includes me letting my psychotic Sister-In-Law in my house, only happens once a year, and yes, she ignores me the whole day!)  Thank goodness 'IT' is not my actual blood relation! - Things I do for my Mr Pita lol

 Angels and doves have to be in there too! 
And of course a magical winter wonderland with snow & snowflakes - is there anything more placid and peaceful than a blanket of white?


I went looking for a dove image, but I found this gorgeous angel one over at Pintrest and I feel in love with it and had to use it (you know how it goes :)  To replace having no dove I raided my feather box and found this really nice whispy white feather that I popped behind a chipboard snowflake and popped a pearl in the center.  The tag I covered with Graphic 45 papers from my scraps basket. Along the bottom I did a diecut fancy border and up the top I added some mini pearls for snowflakes falling from the sky.  

I wanted a 'soft look' so I added some lace to it all along the bottom and up along side the image, and the image got a light dusting of glitter too.  The pearl flourish is a section from a Flourish With a Bling flourish.  And everything got a lovely coat of TH Distress inks too. 

I have fallen in love with this tag!  
As I often seem to do with things I make lol 

Corinne would love you to play along the 
 So head on over to
And come and play along!  

I'm looking forward to seeing you there!  
Happy Crafting ! 

Recipe -
Stamp/ Image(s) -Vintage picture from Pintrest - unknow 
Paper(s) -   Graphic 45
Embellishment(s) -Lace, Ribbon, Chipboard snowflake, Flourish with a Bling Pearls, TH Distress Inks, Feather.


Challenges this creation is entering with the help of the Feline Playful Girls:
Sugar Creek Hollow - Vintage Christmas Image Sat
Glitter n Sparkle - #8 Ribbon & Lace Sat
52 {Christmas} Card Throwdown - Embellishment Pearls Sat C11 (not sure if tags are ok?)
Once Stop Craft - Vintage Christmas Sat E1/2
PaperPlay Challenge - Sweet Angel Thurs E1/2
Handmade Halo - Peace Mojovation Challenge
- - - - - - -

Sunday, November 25, 2012

Paper Piecing @ Christmas Card Challenges

Okie Dokies peoples! 
Sunday has rolled around once again so ...
It is time for a new challenge at

And this week’s theme is....
Paper Piecing

 Hmmm ... not one of my favorite things to do.  
I don't have a lot of patience for fussy cutting :( 
But Mr Mojo and I gave it a whirl anyway :)  
 

 For the bell image - I colored it 3 times and did some fussy cutting to get all the layers.  To the bell I added some black rhinestones, on the bow a light covering of glitter, and it all got a coat of dimensional magic. 
 
 I la la LOVE this ribbon!  Depending on how the light hits it, depends on if you see the gorgeous red or the lush green! So I have 2 shots of the bow to try and show you the colors of this. 

 Magical I tell you!  I found this is in my stash ... 
So my mother must have given me this, it is her style of ribbon.


 As this is not a favorite theme of mine this challenge sat on my desk for most of the week.  I had no clue what to do, tried several other attempts that I did not like :(  So ... I started with the basics and jumped over to The Shabby Tea Room for some inspiration and loved the country goodness colors I saw and then I was off!

The bell image is a digi that I do not know from where that I have colored several times with Spectrum Noir Pens and fussy cut and popped up with foam dots and given a coat of dimensional magic.  I wanted a wooden like background so I made the base DP, found the magical ribbon in my stash that I just HAD to use, and the sprigs for the embellishments are also from my stash of flowers.  To fancy it up a tad, I did some stitching on the image square and matted that onto a Fleur De Lis square and added some more black rhinestones onto the 4 corners of the card.

As always the girls over at
have some yummy inspiration to help get you in the mood too!
So please do pop over, have a peak
and we would love you to play along with us!

Remember the challenge theme is optional, the only real rule is you must create a new Christmas Holiday, winter or Hanukkah card / creation. 

I shall be back next Sunday with another Christmas creation to share with you!
Thank you for sailing in to see me today :)
Recipe -
Stamp / Image(s)- Unknown
Paper(s) - Cream cardstock, Kaisercraft - Kraft cardstock, Designer paper - handmade
Embellishment(s) – Tim Holtz Distress Inks, Dimensional magic, Kindy Glitz, Stash - flower stems, ribbon, black rhinestones.
Challenges this creation is entering with the help of the Feline Playful Girls:
The Shabby Tea Room - Inspiration & bingo - Stitching, gems & Glitter Mon
Crimbo Crackers- Anything Goes Thurs
- - - - - - - - -

Friday, November 23, 2012

Christmas 'BELIEVE' Banner Tutorial @ Inspired Stamps

Good Mornings beautiful peoples :)
Don't worry :) I know it is Friday and not Tuesday!
So what am I doing here sharing a creation with
Inspired Stamps

I am sure you all know about the special posts happening over at
Inspired Stamps
The 12 weeks of Christmas ones!
Every Friday one of the girls are sharing with you a Christmas tutorial!

Well this week it is my turn to share :)
And I would love to share my Christmas "Believe" Banner with you.


(it's a rather long banner so please click on the photo to get a larger, clearer better view of it)

I am sure you are itching to make one of these :)
So let's get on with the show!

You will need -
Elegant Dotty Alphabet Stamp Set available from Inspired Stamps
Vintage Christmas Stamp Set available from Inspired Stamps (Tree sentiment used for background on lettering sentiments)
Sing for Joy Stamp Set  available from Inspired Stamps (music staff used)
Heart Shaped Dies – Nellie’s Multi Fame’s used MFD022
1 inch Circle punch / die – Nellie’s Muliti Frame’s used MFD 020
Black Embossing powder – Ranger Super Fine Detail Powder used
Heat gun
Rangers Archival Ink – Sepia
Distressing Inks – Tim Holtz Vintage Photo and Walnut Stain used
Versamark ink pad
Kraft card-stock
White card-stock
Rhinestones in red and clear - Stash
Lace - Stash
Twin / Ribbon - Stash
Bell x 2 – small – Stash

Techniques used -
Second Generation Stamping
Emboss Resist
Heat Embossing

The Good Part - The How To!

Step 1 – Making the Circular Letter Sentiment ‘BELIEVE’


1. Using the Elegant Dotty Alphabet stamp from Inspired Stamp, Versamark ink, black embossing powder and white card-stock – Stamp out the individual letters of your sentiment and heat set the embossing powder. For this tutorial I am using the word “Believe”. Allow room around each of the letters to cut / punch them out. I stamp first and then cut – allowing me to centre the image more accurately.
2. With you ‘alphabet letter’ now stamped and cut out, ink distress the edges. Next take the tree shaped sentiment from the Vintage Christmas set from Inspired Stamps – I have used this as a second generate stamp for the background. Using the seina ink, ink up the Vintage Christmas sentiment tree, on a scrap piece of paper, stamp once and then stamp over your ‘alphabet letter’ circle sentiment. This gives a softer look and the appearance your letter is floating above the background.
3. Turn your ‘alphabet letter’ over and place lace behind. I run a strip of double sided tape around the edges and then tape down my lace.
4. Turn your ‘alphabet letter’ back over to the front, embellish the dots with rhinestones and place aside.

Step 2 – White ‘Music Staff’ Heart


1. From white card-stock ,cut the smaller of the die-cut heart(s) (9 used for this tutorial) and ink distress the edges. Using the ‘Music Staff’ from the Inspired Stamps Sing for Joy set, Versamark and black embossing powder, stamp the ‘music staff’ repeatedly down and across the heart. Sprinkle with the black embossing powder and heat set.
2. Turn the heart over and adhere the lace to the back – Again, I run a strip of double sided tape around the edges and then tape down my lace.
3. Place hearts aside.

Step 3 – Background Heart

1. From Kraft card-stock, cut the larger of the die-cut heart(s) (9 used for this tutorial) and ink distress the edges.
2. Attach the twine/ ribbon used to hang your banner – I run a stripe of tape up the middle of the heart and place my twine on the tape and then cover again with another strip of tape.
3. Place hearts aside.

Step 4- Assembly of the individual hearts


1. Take one of the background hearts and layer ontop one of the ‘Music Staff’ hearts – I just use double sided tape to stick them together, liquid glue or a glue gun would also work.
2. Next, centre and layer one of your 'letters' on top of the ‘Music Staff’ heart.
3. Repeat the above until all hearts have been assembled.
3.a- For the end hearts, take one of the bells and some twine and tie in a bow. Center and stick down in place of an ‘alphabet letter’.

Lastly - Full Assembly


1. Attach your individual hearts onto a long piece of ribbon/ twine ... and hang :)
I have used little wooden pegs to hold mine in place as I am forever changing things around each year & I hate untie-ing knots and bows. This also doesn't take up as much room in the Christmas closet :)

I hope you have enjoyed this tutorial 
& that I possibly have inspired you to try this too!

I would love to see your creations if you do give this a try 
so please come back & leave me some love so I can come & have a peak!

Don't forget to check out the other amazing tutorials
the girls have shared over the weeks,

and keep your eye on the
Inspired Stamps Blog {here}
As each Friday until the 21st of December
we will be sharing a tutorial with you!

And lucky duckies you! 
You get 2 tutorials from me!
My next is scheduled for the 21st of December
I look forward to you calling past then!

Thank you for dropping in to see me & happy crafting :)


Recipe -
Stamp(s) - Inspired Stamps - Elegant Dotty Alphabet Stamp Set, Vintage Christmas Set & Sing for Joy Set
Paper(s) - Kraft Cardstock, white cardstock
Tools - Heart Shaped Dies – Nellie’s Multi Fame’s used MFD022  & 1 inch Circle punch / die – Nellie’s Muliti Frame’s used MFD 020
Embellishment(s) -TH distress inks, Ranger's Archivael Sepia ink. black embossing powder, Versamrak ink, Stash - twine, lace, rhinestones, bells
Challenges this creation is entering with the help of the Feline Playful Girls:
Wordart Wednesday - Encouraging or Uplifting Sentiment Wed E1/5
Paperminutes - Pennants Tues
Tuesday Alchemy - Anything But A card Tues
Paper Pretties Monday Challenge - PPPMC66 Anything But A Card Mon
Totally Stampalicious - Christmas Non Traditional Colors Mon 
Stamptacular Sunday - Recipe - Ribbon / Twine, Pearls or Gems & Dies or Punches Sat
Crafty-Emblies - Vintage / Shabby Chic Monthly ( I think this fits as it's not a card - let me know if not thanks) Monthly Entry 2
Craft My Life - Anything But A Card Monthly
- - - - - - -

Tag #9 @ 12 Weeks of Christmas - Funkie Junkie Style

Greetings folks :) 

Sailing in today to share another tag I have made for the series of 
This tag is for week #9
And again! Linda just out did herself with her tag!  It is uttlerly drop drop gorgeous! You can see Linda's tag HERE or scroll down to the bottom of the challenges for a pic. 

I loved Linda's tag but alas, my craft room just doesn't have all the cool toys like hers :( So I made do with what I have anyway :)  And I have my fingers crossed the Jolly old man in red will look over my MUST HAVE Christmas list before he goes shopping! lol

I loved the fence like embossed background, the red and white of the stars and the so country gingham ribbon, although Linda's ribbon was green & white check, it still screamed an old fashioned Nanna's kitchen to me so I opted for red and white and I loved how she incorporated the bells.

So ... This is what Mr Mojo and I whipped up! 

I really wanted to include some embossing so I opted for a crinkle inplace of the fence (and I don't have a fence / wood grain embossing folder).  The 'corrugated tin look' is also a little more suited to here in Oz as well.

A raid of my ribbon and I found this gorgeous ribbon and matching frilly trim! 
This screams Nanna's and her Apple Pie to me :$

The embellishments .... I have been doing some shopping :( 
The bells are from my stash, but all the glittery pieces are from Christmas decorations that I JUST HAD TO buy and I have cut a little from each and glued them all together.


The sentiment is a rubber stamp I grabbed from my stash and have embossed it with black and wrapped up like a scroll with some ink distressing around the edges.  I gave the corrugated base a light sanding here and there in places, and touched it lightly with Distress inks in places too.

I am planning on using this tag on a cellophane gift bag of candy cane cookies for a friend!  I think the two are going to look delicious together!

Linda also has a wonderful prize up fro grabs! 
A voucher to spend at 
If you would like to play along to win, there is still time!
And you can find all the details HERE!

Tag #10 was released this week, so once I have that one done I will be all up to date!
Linda created another beautiful tag this week so I am off to be inspired again!
Check you all laters, and thanks for stopping in to see me :)

Recipe -
Image / Sentiment - unknown
Paper(s) -  White Cardstock
Embellishment(s) -  TH Distress Inks, Ranger black fine embossing powder, Rhinestones, Stash - Ribbon, Bells, Christmas Decorations

Challenges this creation is entering with the help of the Feline Playful Girls:
Crafty Creations Challenge - Christmas Is Coming Wed
Holly Jolly Christmas - The 3 R's - Red, ribbon & rhinestones Tues E1/2 C10 
Loves Rubberstamps Challenges - Use Ribbon Tues 
- - - - - - - - - - -

Thursday, November 22, 2012

Going Dotty @ Moving Along With The Times

Mornings all! 
Thursdays always bring a thrill around here! 
As it is brings a new challenge at ....

I also have some news to share with you today :(
It has been a really busy last few months for me,
and I have an even busier new year planned with
returning to work full-time, so after much thought, tossing and turning,
 I have decided to step down from the team :(

I love the cabbage patch of nutters over there so I will still be playing along with them whenever I get the opportunity too!  They are a fantastic bunch of girls to work with and I thank them and Hazel for inviting me onto the team!  I have had a blast and made some great friends that I will never forget and hope to visit and drop in on often!

Talking about Dream Teams to work with! 
Moving Along With The Times  
is also holding a DT call! 
You can check out all the dets HERE!
Go on ... check it out!  You will not find a better patch of folks to work with! 
I'm seriously tempted right now to delete my post and take back my resignation! Cause these girls ARE that nice!  

 You are also here for a challenge!
So ... This week Claire is challenging the team to ...
Let's go Dotty!
 We wanna see spots / dots!

This is an easy challenge!  So I am sure you are all up for it and will play along! 


Now ... I warn you, with my card this week ... 
You may need a paper bag as you are likely to hyperventilate! 
I have gone ... 
Clean and Simple this week!   
 

 Yeah baby!  That is ONE layer! 
OMG!  I struggle to breath now just looking at this! :)


 See! I can shock you all every-now and then lol 
 And hey!  After all!  It is nice to go out with a BANG! 
 
I do love Clean and Simple, specially when everyone else does C&S.  I myself just can not do C&S!  I always end up adding on more and more and more!  But I do love this card and it was a really nice challenge for myself that I think I am going to have to really challenge myself like this more often! 

The gorgeous image and sentiment is Snow Mom from Stitchy Bear Digital Stamps, I have colored her with Spectrum Noirs (another thing I am challenging myself with in this card) and I do love how she colored up!  For her snow pom pom I have used clear stickles and for the fluff on her hat and coat some white 3d fabric paint.   For some dotty-ness I printed out with the image the dotted border and have also added some snowflakes with liquid pearls. 

 Stitchy Bears Digital Stamps 
are also sponsoring our challenge this week! 
And there is a fabulous prize up for grabs! 
   
 And the Moving Along With The Times girls
 have gone a little spotty too this week 
so be sure to pop on over and see the girls!  
They would love if you called past! 
 
With a heavy heart I bid you all a farewell! :( 
And thank you greatly and muchly for calling past to see me today :)
Recipe -
Paper(s) -  Copic X-Press Blending card
Stamps - Stitchy Bear Digital Stamps - Snow Mom
Coloring Medium - Spectrum Noir pens - Crafters Companion
Embellishment(s) -  Stash - Liquid Pearls
Challenges this creation is entering with the help of the Feline Playful Girls:
Can You Digi It - Clean & Simple Tues
Incy Wincy - Square Cards Mon 
One Stitch At A Time - Use a Digi Mon # after name
Totally Gorjuss - Plain & Simple Sat
- - - - - - - - -