Showing posts with label Fancy Fold. Show all posts

Tuesday, December 4, 2012

Spellbinders Explore Beyond Challenge! - Home Decor - Fairy Wand

Hi Folks :)

I am super excited about the
So much so,
 that I have been having great fun tinkering in my craft-room playing
around with Mojo and have made another creation!

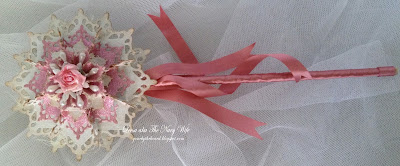
This magical fairy wand is for the
Home Decor Category!

I am going to say ...
This piece was a labor of LOVE
But oh my! It was heaven to tinker with and put together!

I used 2 Spellbinders - The Floral Flourishes for the white glitter delicate leaves around the center of the flower. And all the flower layers are made from some fussy scoring and folding of Fleur De Lis Squares.

A close up of side 1-
I used glittered card from Bella! Glitz - White & Blush.
The piece is embellished with ribbon from my stash, Blossoms by
Vivaldi, handmade pins, wooden fibers & glitter for the center flower. 

A side view - Yes! Both sides of the wand have the
same layered flower feature!
Again ... Labor of LOVE!

Close up of side 2 -
I have certainly captured the image I had in my head for this piece, would even say it has turned out way more brilliant than I expected it to!  I love the pink and white color combo and that I still managed to catch the shabby beauty of it with some light TH Distress inking and the embellishments.
I don't think you want to know how long this took to put all together lol 


I will have to say I have seriously fallen in love with this piece!  The wand looks stunning as it it, but I have had a brainwave to make more and use as Christmas tree decorations - So I am challenging my self to next year, making one a month to have have a set of 12 by Christmas next year!   I would also love to play with the colors more and try a white & blue one, a brown & pink and a blue & brown!  MMM I can see the tree now with 3 of each of the color combo on it and I think it would look just magical!  Ohhh could you image a tree filled with just these! Oh My!  I need to stop thinking NOW lol!

I can say it has certainly been a hit with the girls too!  All morning they have constantly been walking in and out of my room to look at it as they oh and ah over it!  I have promised them if it doesn't make the finals and get posted off that they will get it for their dress up box so they can play with it.  Will certainly have to make another one as I don't think they will like sharing just the one though :$

Well, I am off to tinker again!
Thanks for calling past to see me today :)

Thanks for calling past to see me :)

Recipe -
Paper(s) -   Bella! Glitz - White & Blush
Tools -  Spellbinders - Fleur De Lis Squares, Large and Small Squares and the Floral Flourish
Embellishment(s) -All from stash - ribbon, Blossoms by Vivaldi, handmade pins, wooden fibers, glitter & wooden dowel. 
Challenges this creation is entering with the help of the Feline Playful Girls:
Spellbinders Explore Beyond Challenge - Home Decor Entry
Make It Monday - Anything Goes Mon
Anything But a Card Challenge - Anything but a card Sun
Amusing Challenges - Die Cut Sun E1/2
Crafty-Emblies - Vintage / Shabby Chic Monthly E3
Glitter & Sparkle - Flowers
Joanna Sheen - Anything but Christmas Mon
PanPastel Uk - Gift Time Mon
Sugar Creek Hollow - Distressing Mon
- - - - - - - -

Thursday, November 1, 2012

Sparkle Challenge @ Visible Image

Good morning folks :) 

I have some super exciting news to share with you all today!
Starting the 1st of each month (yep that would be today!)...
Visible Image!
will be holding a monthly challenge! 
Woo hoo! Exciting times! 
and gorgeous Visible Image prizes to be won!

And this months challenge is a shiner!
We wanna see you SPARKLE!
So it is time to get your bling on girls!  
Get out the glitter, the metal & anything that sparkles & shines! 

This challenge called for diamonds! they after all; a girls best friend!
And nothing goes better with diamonds than
  the gorgeous vintage Corset stamp from Visible Image.
So Mr Mojo and I got in tune with our feminine side & knocked up a gorgeous notepad / diary along with a matching tag from the scraps.

And as this challenge is all about the 'sparkle' ...
You might want to pop your sunglasses on! 

Tag & cover of notepad / diary

Close up tag and the gorgeous Corset!

Tag side view - I've stamped the corset twice & popped it up on some pop dots.

Front view of notepad / diary and that yummy Corset stamp again!

Side view - love the bling on the spine!

View from the other side. 
(see how thick that pad is!)

Close up of Corset & in the background is Girly Background stamp also from Visible Image. 

The inside - The corset is stamped on the corner of each page.
(that took forever and I still {love} this stamps after all that lol)

Back of the notepad / diary.

And the set together again. 

I am just in {love} with this stamp!  it is so gorgeous & versatile & it mixes well with so many other stamps too!  Today I mixed it up with another of my favorite Visible Image stamps; Girly Background.  I have stamped the Corset with Ranger's Archivel Sepia ink given it a coat of clear embossing powder and then a sprinkle of Stampin' Up's Dazzling diamonds for some extra shine.  With the Girly Background I did a second generation stamp using Kaisercraft's Rose ink (wish they still made their inks! they were a bargain buy & great for those colors you don't or won't use a lot.)   The embossing folder was also inked up in the rose to get a porceline look. (sorry it doesn't show well in the photos)

For the base / frame of the notepad / diary cover I used Kraft & then matted the Corset and embossing folder pieces on pink & brown cardstock.  Added some lace under the bottom matt and then blinged up all around the edges with a mix of baby pink rhinestones in the center & a darker pink around the outer edges.  For the notepad / diary embellishments, I made a ribbon flower added a blingy button center, a feather popped in behind & added some pink pearls wisps.  

For the tag I used up the scraps left over from the notepad / diary; incorporating the Girly Background and Corset stamp again & the porcelain look embossing with the folder.  The 'Merry Christmas' sentiment I did some masking on another of Visible Image stamps; Christmas & New Year & then framed it with some lace & added some punched snowflakes blinged up with some rhinestones in the centre, & lastly, followed the sparkled border theme through with rhinestones around the edge as well. And for a non traditional Christmas stamp, the Corset scrubs up well for the festive season!

These are really simple to make & I have a tutorial on how to make these right {here}!
As you can see, I have made up a few they are that simple to put together :)

I think Mojo certainly covered the 'SPARKLE' agenda of this challenge!
And I hope I have inspired you to play along!

We would love you to link up and share your creations with us at 
You can get your Visible Image stamps from {here}
Check out some of the amazing creations the DT have made on the blog {here}
Or come along and chat with us on Facebook {here}

And for the lucky winner ...
They will receive a prize of .......
 A £10 gift voucher to spend at Visible Image!
and there is also have THREE (yes 3) Visible Feature Badges
to give away to our favorite THREE creations! 
You do not have to use a Visible Image stamp to play along (though we do love when you share them with us & you will get an extra entry into the draw if you do!) And ... You can enter as many times as you like! (The more you enter, the better your chances!)

For a non small print on all the details check out the
 Visible Image blog  
or you can just click {here}

The Visible Image girls have all raided their sparkle stash too!
So be sure to check out their inspirations and share some love with them too!
We would {love} if you played along with us!  
So please do come join the fun! 

Thanks for calling past to see me today :) 
I'll be back on Saturday to share with you another creation with Visible Image :)
Recipe -
Image / Sentiment - Unknown
Paper(s) -  Kraft cardstock, White cardstock, brown cardstock
Tools - Small snowflake punch, Embossing folder - 
Embellishment(s) -  TH distress inks, Kaisercreaft Rose ink, Versamark, Rangers Archival ink - Sepia, Stampin Up- Dazzling Diamonds, Stash - ribbon, pearls wisps, rhinestones, feather(s).

Challenges this creation is entering with the help of the Feline Playful Girls:
It's All About the Vintage - Make your own Background 2/2Thurs E1/3
Crafts & Me Challenge - Bling Wed
The House That Stamps Built - Anything But A Card Wed
Paper Shelter - Anything Goes Wed E1/3
Whimsy Stamps Challenge - All Things Sparkly Wed E1/3
Party Time Tuesday - Anything Goes Tues E1/3
Through The Craft Room Door - Anything Goes Wed E1/3 GDT
Love to Create - Lots of layers  Mon E1/3
Robyns Fetish - Embossing Folder Sun
Craft My Life - Anything But a Card
- - - - - - --

Saturday, August 6, 2011

GDT @ Creative Craft World - Happy Birthday Challenge

Today I have been very fortunate to Guest Design along with the gorgeous girls from
Their challenge this week is .... 
Birthday's!

I must say a huge big thank you to Choccy and the girls for letting me play along with them this week as I had sooo much fun creating my project!

I got creative and made a handbag card, but have given it a double use as gift packing; to co-ordinate with a Birthday pressie butterfly necklace gift !  

 The bag closed (pressie is inside)

 View when you first open the bag - That middle square with the butterfly on top is the gift box.

 View when you move the gift box - you see the beautiful butterfly verse. 

 Close up of verse. 

 View of the back .

 Close up of the front of the bag. 

 Close up of butterfly on the gift box.

This week the lovely prize sponsor of 


I have given this piece a very vintage/distress feel with ink distressing to the cardstock base and each individual piece of the layering DP.  To give the butterfly a vintage feel I have printed it onto matching DP as the bag, ink distressed the edges and then heat embossed each butterfly layer with clear think embossing powder and then decoupaged it up to layer it and give a 3D effect.  On the bag for the butterfly antenna I made some fancy posh pins and bent them up a little and placed them underneath the butterfly.  I have used brown pearls for the butterfly trail and tiny light green gems on the fluttering ticket for the flower centers and under the sentiment. 

The ribbon is an old ivory piece from my stash of left over things and while I have added Velcro dots to close the bag; I also included the light green raffia tie as I think it looks really cute  (also it is easier to tie having the Velcro holding the bag shut).  

  I made this to add to the birthday pressie stash of things for my MIL, and to be honest; I do not want to part with it! lol as always my case!  And it was just by fluke that while out shopping with hubby last week that I came across this necklace and instantly in my head I was wondering if it would fit inside the bag!  I am taking it as a sign I was meant to make the bag and I was meant to buy the necklace (not that a girl needs any excuse to go shopping!)

Hope you like what you see, and I hope you join in the fun and please do pop by 
Check out the stunning work the 
DT have for your inspiration
and join in the crafty fun!

  If your wondering how I made this ... I followed the tutorial here on inkido that Kristine from Lost in Creativity was so kind to share from her inspiration from Piabau's blog.  (try saying that 7 times really fast lol)

I also have a tip for you this week ,
 something I learn't from my girls in class 
(yes I know I am meant to teach them lol)
 
If you have trouble removing your cardstock / DP from any dies, spellbinders ect,
the fancy detailed swirly and flourish ones like I do.
Place a piece of glad bake paper (grease proof paper)
between the die and your cardstock and cut it as per normal,
it will come out of the die clean and easy like a piece of cake!
No more biting your tongue as you fiddle to get it out trying not to tear it!


Challenges this creation is entering with the help of the Feline Playful Girls:
* Crazy Amigo Challenge - Anything Goes open till Aug 16th (-/-)
Papertake Weekly Challenge - Anything Goes with opt Metal - Metal pins and eyelets (Tue -/-)
Party Time Tuesdays - Birthday & A Hop (Tue 1/3)
Top Tip Tuesday - Blue, Green & Brown (Tue 2/3)
Top Tip Tuesday - TIP at end of post under signature before challenges list. 
Craft Your Passion - Anything Goes (Mon 1/3)
HLSC Challenge - Anything Goes ( Mon -/-)
Incy Wincy Designs - Monochromatic Colors (Mon -)
Kaboodle Doodles - In The garden (Mon  -/-)
Lexi's Creations - Shaped Card (Mon -/-)
Stamps R Us - Birthday Challenge (Mon -/-)
Woodware USA - Anything Goes (Mon 1/2 *)
Come & Get It Challenges - Anything Goes (Sun 1/2)
Crafty Ho's - Last Challenge - Anything Goes & Hop (Sun -/-)
Dream Valley Challenges - Surprise Element (Sun 1/3)
Lollipop Crafts - Celebrate & a Hop (Sun -/-)
Sentimental Sundays - In The Garden must inc sentiment (Sun -/-)
Sparkles Forum - One for the girls (Sun  -/-)
Stampin' Sisters in Christ - All creatures great and small (Sun  -)
Simply Create - Favorite Animal - Butterfly! (Mon -)
Clearly iStamp - Things with wings (Fri 1/1)
Just Add Ink - Tearing / Distressing - ink distress (Fri -)
Raise The Bar - Anything Goes (Fri -)
Fuzzy Wuzzy - Shaped card inc an animal (monthly -)
Yes there is lots of challenges! 
But I am a Feline Playful Girl AFTER ALL!
- - - - - - -

Sunday, March 27, 2011

It's Mother Day! @ The Crafty Pad

Yahoo! It's another week gone and time for a new Challenge with .... 

This week the girls have all done an amazing job to inspire you all to play along with us. 

And this week .... we wanna see ...

Mothers Day!
This can be in a gift, card, tag or whatever you can think of that relates to Mothers Day!

Here is my interpretation on this weeks challenge - 

I made an adorable tea light holder box with a tag insert for my mum.


 Today I have also used a digital image from The Crafty Pad  colored with the usual watercolor pencils and it is called Gift For Mum and you can purchase it from HERE.  And again I have been playing with the Basic Grey Papers (So in love with them!) and I really love this ribbon, it is one of my favs!


So ... Wanna know what you could win if you play along with us this week?

3 Digital Images of your choice from Crafty Sentiments!
This site has some stunning images so worth having a peak at!
 Lucky for you the DT can not enter or I would be crafting aplenty this week to be in the draw :P

A quick recap on the rules for you all ... 
You have till Saturday 8pm GMT to get your entries in and you can play along as many times as you like so long as it fits with the challenge theme! 

And don't forget to check back at The Crafty Pad this Wednesday - I heard there is going to be a tutorial on handmade flowers.
(hint hint *just like the ones I use on my cards*)
 
Challenges I am entering with huge thanks to the girls at Feline Playful for making it all so easy!
 A Gem Of A Challenge - #17 Anything but Square
 Allsorts Challenge - #96 For a special lady
Basic Grey - Something Recycled - the tea-light candles are recycled from a glass gift set I received that Miss Chloe broke :(
Craft Your Days Away - #16 For Mum or a special lady
Crafty Emma - CES Challenge - #29 Die Cut Crazy 
Easy Craft Projects - #34 For mum 
Wee Memories - #49 Anything Goes
Card Makin Mamas - #17 Animals
Crafts 4 Eternity - R#12 Add something Hidden to your creation (1 of 3)
Frosted Designs - Reuse or re-purpose things around the house - The tea light candles
Fairy Tale - #11 Pink & Green
Phindy's Place - #49 All about animals
Simply Create - #40 Do it yourself
Art Impressions Stamps - #9 Water coloring (*)
Digi Doodle Shops Best - #52 Ribbon & bows
Dutch Dare - #105 Celebrations & a HOP
Craft and Me - #27 Anything Goes
Freshly Brewed - #4o 2 or more embellishments
Scrapbook Sisters - #28 Anything goes
Simon Says Stamp - Mothers Day/Girlie
Bearly Mine - #6 Mothers Day (1 of 1)
Karen Doodles - #55 More than 1 fold
Papertake Weekly - It's a mom thing
Tuesday Throwdown - #41 Anything but a card***EDIT*** Made TOP 3!
My Grafico - March Anything goes
- - - - - - - - - - - - - - - - - - - - - - - - -

Monday, October 25, 2010

Oh Baby ! - Wallpaper sampler

On one of my Wednesday evenings when my darling petal hubby was around I took the opportunity as I always do and went to a Scrap & Chat night (I soo miss them! And while I love when Ms Sal comes over for a play with me it just is not the same as being in the shop and having hundreds of papers and bits and whatcha ma callies all at your fingertips). 

On one particular evening I came one with a stunningly gorgeous card that I had made.  And, as petal does, I had to produce my hard work for show.  I was given the response of ‘hmm it’s a card, I can see that’, ‘it looks like a wallpaper sampler you get from Bunnings with the way it all folds down and all the colours, looks pretty though’.  And hence among all crafters at Dreamswork the wallpaper sampler card was born, created and shall hence forever be known as. Thanks hunni!

I have a friend that has just had a baby girl and I wanted to give her something extra special as I wanted to include a gift card voucher and this perfectly came to mind. (For the record I hate doing gift vouchers but she lives interstate and the cost of postage along with the fact that I was not sure of what she had or not, it was the safer bet to go).

I apologise as there is lots of photo’s but it’s a very detailed card.  Also as I have made it ready to post and some embellishments needed to go on around photo’s to finish it and as I do not have a real trendy photo editing program I just stuck a sticky note over some parts of the pictures for privacy reasons.  (thanks for understanding).


The card has a total of 4 folds and five individual ‘panels’ each panel is 14cm wide and 16 cm high.

Here is the front of the card. – You can use a Velcro dot but I prefer to use a square of foam tape as it doesn’t interfere with the overall finish of the card once hanging (and I design all my cards to finish being hung (usually with photos of the kids). 


It then folds out to like this (front view)


And like this (back view)

Following is individual close ups of the front 5 panels. - Starting at the top and working down.
This is a chipboard baby girl that I glittered in Clear and it so sparles and looks stunning.


Here I added glitter highlight dots to the patern papper and the flower centres.

I love this huge big glittered flower put together with a brad.  It really brings focus to bubs.


Flowers and glitter again. The whole card sparkles like a gem!


I love this peice of patterned paper.  The bird I have actually paper toiled from a second piece and placed over the bottom layer so it stands out more.  And the butterflies floating up the side set the bird as if it is itching to catch one of them and eat it.
Following is individual close ups of the back  5 panels. - Starting at the top and working down.
More butterflies

 I have put the giftcard in the top pocket but you could use any of them.

My message.

A pocket with a tag insert. (tags below)

2nd pocket with a tag - Tag picture below.

The two tags in the photos above


 View from the side


When all folded together the card is no more than 2cm deep making it still perfect to be posted in a padded envelope or in a box.

Close up of the flower (opening tab on the front) I love how this came up with the glitter that I just had to add a pic :$


I love this card! It came up so beautiful and I love the fact that it has an additional purpose being able to hang on the wall for display.  With the addition of the photos it makes a great wall hanging and the photos can be changed in future to update them if one wishes. I have also made this card without adding photos and instead using/adding more pockets and added more tags and it looks stunning that was as well. I also love the fact that I was able to use the photos emailed to me with their birth announcement and the recipient is so not going to be expecting to see their pictures in a card.


Challenges

Melijen's Designs - #30 Anything goes (2nd Entry)  (Wednesdays)
 Flutterby Wednesday - #127 - (Wednesdays_ I have bytterflies on the front and throughout the project.
Penny’s Paper Crafty- #40 So long as it flies (Wednesdays) There is the bird on the front along with the scattered butterflies thoughout.
Southern Girls Challenge - #4 Glitter it up (Thursdays) It is glittered, sparkling and shining.  I have used Kindy Glitz  along with patterned glittered papers and jewels.
Aud Sentiments Challenge - #13 Anything that has to do with a baby  - It’s a Girl sentiment on the front. (Thursdays)
Tuesday Throwdown – #22 Anything goes (2nd Entry) (Tuesdays)
Top Tip Tuesday (2nd Entry) - #7 Anything goes (Tuesdays)
 I Did It Creations - #26 Surprise me (Fridays)
If The Shoe Fits - #52 Chipboard - I have the Chipboard and then glittered "Baby Girl" (Fridays)
 Totally Gorjuss – #53 - Sparkle - It is glittered, sparkling and shining.  I have used Kindy Glitz  along with patterned glittered papers and jewels. (Saturdays)

Fair winds and following seas.
The Navy Wife