Thursday, March 7, 2013

Scripture @ Inspired Stamps

 Mornings all :)

Wow! The weeks are just flying by! Where does time go?
Here we again on Thursday and I have another
card to share with you all :)

This week it was free play! Love those! And I thought I would do exactly that ... play!  I have had the adorable Love Is set from Inspired Stamps sitting on the side of my desk itching to be played with since forever.  The verse in this set is just amazing and it is one of my favourites and I really do just adore the last verse of this, so ... today was a play with some masking!


 Love never fails ... I don't know what it is about this line, but my heart just stops, reflects and feels soothed. Again, I am playing around with my style :$  One of my new years resolution was to attempt more C&S cards and really try this style out, I still love the shabby / grunge look and the loads of embellishments though and it always find a way or part way in somehow lol.     

All the girls on the team are sharing creations today so please do drop by
 Inspired Stamps Blog 
and share some love with them!

Thank you for stopping into see me today and sharing my Inspired Stamps creation with you!
I look forward to sharing another with you next Thursday :) 
Happy Crafting till then! 

Recipe -
Stamp(s) - Inspired Stamps - Love Is 
Paper(s) -   White & kraft Cardstock,
Tools - Dry Embossing, Die cuts.
Embellishment(s) -Twine, Flourish with a Bling pearl flourish, Prima flower.
- - - - - - - - - -

Thursday, February 28, 2013

Easter Card Set @ Inspired Stamps

Mornings dear friends :)

Is really on the ball this week and the girls and I are hopping to inspire you all to get ready for the next celebration of the season ...

Easter!

I must admit, this is one season that usually gets neglected and overlooked in my house and this year Easter is even earlier than normal being the last weekend in March.  So what better theme than to focus our attention on some Easter sets and that is actaully what we are doing this week!

I think that one of the reasons I can easily overlook this season is as I don't have many Easter stamps :( But alas I let my mind wonder to the season of spring and it didn't take long for an idea to pop into my mind using the Flower Buds stamps from Inspired Stamps.  These adorable little flowers remind me of violets and just sing spring to me!
 
 The set together .

Close up of card 1

 Close up of Card 2

Close up of Card 3

 All together again :)

Have you noticed a habbit of late?  I am really trying my hand at C&S!  I do love the look of C&S but in my own cards and attempts at C&S I have never felt like I have ever done the card enough justice nor have I ever been entirly happy with the end result.  One of my new years resolution was to attempt this style more often and as I do more and more of them, I think I am beginning to get better at them.  Mind you ... For a card with such minamal compaired to my normal over embellished ones, C&S seems to take me twice as long as I constantly question myself and every step! lol

This was a really fun set to put together though!  To use the one image in 3 very different ways was challenging and rather rewarding when I was finished.  I am still amazed at the variety of looks and styles you can achieve this way.  The flowers have all been stamped and white embossed and then colored with water color pencils.  For card 2, I stamped and colored an extra flower and toiled it up to make the flower deminsional.  I do love them all, though card 1 with the 3 flowers along the bottom is really hitting a soft spot with me :$

As always, the Inspired Stamps girls have some inspiration to share with you too! 
So please do drop by the blog and see them!
You won't be disapointed with sets they have to show you.

Thank you for stopping into see me today and sharing my Inspired Stamps creation with you!
I look forward to sharing another with you next Thursday :) 
Happy Crafting till then! 

Recipe -
Paper(s) -   Kraft Cardstock, Scraps Cardstock
Tools - Spellbinders Scallop Squares & Large Squares
Embellishment(s) -Distress inks, Water color pencils, white embossing powder, ribbon, bling.
- - - - - - - - - -

Thursday, February 21, 2013

Scripture @ Inspired Stamps

Good mornings beautiful people!

I am popping in this week with a card for
This week the team have been given free play with some
Scripture

Over the past few weeks I have raided my stash of cards that I keep on hand and was in urgent need of a Thank You card so Mojo and I jumped straight into it this week using one of the sentiments from the Thank You set from Inspired Stamps.
  
I have not played with my Shilouette Cameo in forever so I had a play and made the gorgeous card base with the leaves edging.  I also cut the leaves from the Cameo as well.  I raided my scraps stash for the cardstock pieces on the front, added some stitching, a Stampin' Up bradto the largest leaf, scattered some red pearls and a touch of a few wire scroll vines and wella, I was done and happy :)

Don't forget to pop on over to the
 Inspired Stamps Blog 
and see the gorgeous works the girls have got for you!

Thank you for stopping into see me today and sharing my Inspired Stamps creation with you!
I look forward to sharing another with you next Thursday :) 
Happy Crafting till then! 

Recipe -
Stamp(s) - Inspired Stamps - Thank You
Paper(s) -   Kraft Cardstock, Scraps Cardstock
Tools - Shilouette Cameo
Embellishment(s) -Stampin' Up Antique Brad, Red Pearls, Wire
- - - - - - - - - -

Wednesday, February 20, 2013

Mojo's Silver Lining

Good morning folks :) 

I've been fortunate to get a moment to myself of late, 
so I took the opportunity to play along with some of my favorite challenges! 

The Shabby Tea Room has a gor-gor-gorgeous inspiration picture this week and the challenge is Aqua, Brown and a touch of silver.  When I saw this pop up on my blog roll on Monday I just could not resist and had to play along....

So I played :)


Ohh I had so much fun making this, so much so, that I crafted way past my curfew and I did not want to get out of bed this morning lol But ... It was sooooo worth it! :)

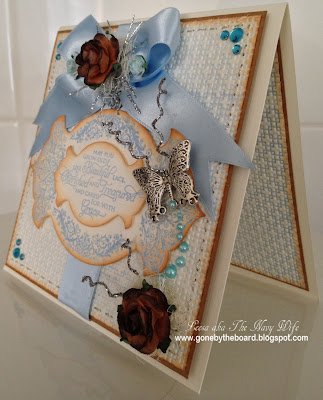
I am absolutely in love with the square lattice embossing folder from Stampin Up at the moment (I don't know why? I just am!) and I am also going through a craze of inking my embossing folders so I had to do that too with Versa Mark Sky Blue ink.  The sentiment along with the dies are from of the Amazing Paper Grace kits that I have again stamped in the Sky Blue and also heat clear embossed and distressed the edges with TH Tea Stain.

I really had no plan of attack with this card, I kind of just crafted and let things go where ever they went.  So for the silver lining of the challenge, I first decided to add some metallic silver stitching around the edges and as the card came together the silver butterfly charm made its way into the card and then the glittered silver sprigs in the flower embellishments.  

I am not sure why, but I had the brain wave to grab a bobbin and decorate it as well in the same style.  And for the little dust collector it is, I think it is a perfect trinket to go with the card.  Mojo seems to have found his groove again so hopefully I will be back soon with something else new to share :)

Fair winds and following seas till then xx
And thank you for sailing in to see me today!
Recipe -
Stamp(s)- Sentiment - Amazing Paper Grace Kit
Paper(s) - White Cardstock
Tools - Spellbinders - Amazing Paper Grace Kit, Stampin Up Square Lattice Embossing Folder, Versa Mark Sky Blue Ink, TH Tea Stain Distress Ink.
 Embellishment(s) – Flowers / bling / metallic thread / Ribbon / Butterfly all from stash. 
  
Challenges this creation is entering with the help of the Feline Playful Girls:
Addicted To Stamps and More - Vintage Wed E1/- C10
Inky Chicks - Mother's Day or Birthday Tues E1/3
Deep Ocean Challenge - Letter "B" - Birthday, blue, brown, bling, butterfly,  bobbin, bow, blooms Tues
ABC Challenges - All Stitched Up Mon E1/3 C10
Simon Says Stamp and Show - Metal Mon E1/-
The Shabby Tea Room - A Silver Lining Mon E1/-
Sugar Creek Hollow - Metal Mania Sat  E1/3
Allsorts Challenge Blog - Things with wings Sat 
- - - - - - - -

Thursday, February 14, 2013

More Love @ Inspired Stamps

Good mornings beautiful people!

I am so sorry I have been so absent from my blog of late :( 

Unfortunately sometimes life just gets in the way and crafting and blogging just has to take a back seat until one is back on the rails and in full swing of things again. 
While there is still some fine tuning to do, I think I may have found the perfect balance of life, working and 'my time' to do some crafting. 

Mojo also seems to have returned from his rather long absence too!  
So we have a card to share with you today! Woo Hoo! 

Being that Valentines day is on our door step!  This week at 
we are putting our focus on 
'Love'

Today I have used the Love Is stamp set from Inspired Stamps.  I just adore this set! And I have an idea brewing on how to use the gorgeous scripture that comes with this set too!  

I do appolagise for the poor quality of my photo today and the lack of photos.  I thought I had photographed this card, Hmm well I had taken one pic! And then I got distracted with fecthing the kids from school and absent mindedly popped this in the post to my mum before finishing the shoot! *doh* yeah! I have been having a few days like that lately lol 

The Inspired Stamp girls and I would love to share the love with you too! 
They all have some la la licious cards up on the
 Inspired Stamps Blog 
So please do drop by and share some love with them too :)

Thank you for stopping into see me today and sharing my Inspired Stamps creation with you!
I look forward to sharing another with you next Thursday :) 
Happy Crafting till then! 

Recipe -
Stamp(s) - Inspired Stamps - Love is 
Paper(s) -   White Cardstock, Black Cardstock
Tools - Spellbinders - Fleur De Lis Sqaures & dies form November 2012 Kit by Amazing Paper Grace.
Embellishment(s) -Stickers, Red and black Bling, Ribbon and button. 


- - - - - - - - - -

Tuesday, January 15, 2013

Love @ Inspired Stamps

Good Mornings all :)

Appologies for my slow start to this new year,
Christmas, family and friends are all still in full swing of celebrations around here!
(yeah still!)   And things won't actually fully return to 'normal' till the last guest leaves on January 25th! 

I did manage to find just a tiny moment to make a card for this week for

This week, we were asked to focus on
'Love'

Being pressed for time, I feel I have cheated by going for a clean and simple card this week :$
But oh I do love how gorgeous it looks!


I could not resist using the gorgeous resin rose from Hanmade Halo and with the pearls and the so sweet sentiment from the Inspired Stamps - Love is Set.  I am still having a love affair with the Fleur De Lis Sqaure, they make a very elegant and classy card, I think anyway. lol 

The girls have all been busy this week too!
So do pop on by the

Thank you for stopping into see me today and sharing my Inspired Stamps creation with you!
I look forward to sharing another with you next Tuesday :) 
Happy Crafting till then! 

Recipe -
Stamp(s) - Inspired Stamps - Love is 
Paper(s) -   Hammed white cardstock
Tools - Spellbinders - Fleur De Lis Sqaures
Embellishment(s) -Resin rose - Handmade Halo, Pearls - Flourish with a bling


Challenges this creation is entering with the help of the Feline Playful Girls:
Make My Monday - Die cuts / Punches Mon C6 E1/1
Sugar Creek Hollow - Winter White Sat
- - - - - -

Friday, January 4, 2013

Santa's Candy Winner

Good morning and Happy New Year folks! 

My greatest apologies for the lateness of this post :( 

It is Murphys' Law if it can go wrong ... 
it will go wrong and hi ho that was the end of 2012 for me lol

Anyway .... That is a long story and a new laptop later :) 

Today I have the greatest pleasure in announcing the lucky winner of the 

Thank you so much to everyone that played along!

I asked Mr Random to pick a lucky number for me ...
And he pulled from his lucky hat ....
The number ...

27... Nat from CraftyNats

Congratulations Nat!
You have won Santa's Stocking full of all these goodies!
£25 voucher to Halo Handmade
8 Packets of my favorite Prima flowers including -
 Flower Frilllies in Plum, Orchid & Wine, Caravan in Sultans Robe & Morrocco Red, Medicci Flowers in Plum , Baroque Blooms in Plum & Zazl in Lilac
Total value over $100 worth of goodies! 

Nat, if you could please email me at thenavywife@y7mail.com and I shall arrange the postage of your prize and the gift vouchers.

Thank you again to everyone that played along. 
I look forward to continuing my crafting journey with you all in 2013.

Monday, December 31, 2012

The Year that has been!

Good Evenings all :) 

I remember recalling last year some crafty bloggers posting some of their favourite cards and creations that they had made through out the year.  At the time when I was reading many of the posts, it was already well into the new year and it seemed a little late for me to do something similar, so I made a note of it in my diary.

Here we are a year later,
and I would love to share with you all some of things 
I have made this year that I really have cherished and fallen in love with! 
 Bear in mind, I make a Christmas creation once a week! 
So this list could be a little Christmas biased :$

Scripture Love is card
 original post can be found {HERE

The 3 Ribbon Christmas Trees
original post can be found {HERE

Angel Christmas Card
  original post can be found {HERE}

Paper Christmas Tree 
 original post can be found {HERE}

Stitching you well soon card
 original post can be found {HERE

Handbag Card 
 original post can be found {HERE} 

Va Va Card
 original post can be found {HERE}

Teddy Bingo Card
original post can be found {HERE} 

A world full of beauty card
original post can be found {HERE

Scrap war, create peace tag
 original post can be found {HERE
 
 Tag #6 for The Funkie Junkie 12 Tags of Christmas
original post can be found {HERE}

The fairy wand made with Spellbinders!
original post can be found {HERE}

Now I could easily list more! lol 
But I thought it would be nice to cap it a 12 for the 12 months in a year :) 

It was really interesting to go back through this years posts and see where my crafting style was at the beginning of the year, to where it is now.  I also found it a little amusing to read and note some of the 'trends' my crafting has had through out the year, like my 'have to heat emboss everything stage', must sew on every card ect ect.  It really is quite funny to scroll back through! 

Anyways! 
Thank you for sharing these with me :) 

I would also like to wish each and every one of you a
 
May this new year find you
healthier and happier,
peaceful, content, satisfied,
looking forward
to fresh, revitalizing interests,
a variety of pleasures,
interesting new people,
material and personal successes
to make this new year
the best one yet.
Happy New Year!
By Joanna Fuchs
 
Have a wonderful evening folks! 
Cheers xx 

Sunday, December 23, 2012

#4 Jingle All The Way @ Christmas Card Challenges

Mornings People!
It is time for a new challenge at

And this week’s theme is....
#4 Jingle Bells

I am busy busy busy at the moment, 
So I am just going to swing by with my inspiration card 
and leave you good folks to it! 


A little C&S piece for me today, 
pulled all the papers from my stash, used an old sketch from Mojo Monday and wella, took just a jiffy! 

Now we would love you to play along with us!  
And you have it rather easy as 
The challenge theme is optional, the only real rule is you must create a new Christmas Holiday, winter or Hanukkah card / creation. 

So pop on over to
link up your creations and play along with us! 
We would love to see your creations!
I shall see you over there!

Thanks for dropping in to see me today!
Recipe -
Stamp(s)- Sentiment - Kaisercraft
Paper(s) - Scraps
Embellishment(s) –Ribbon, bells, peals.
- - - - - -

Friday, December 21, 2012

Bon bon Tutorial - no fuss no cut! @ Inspired Stamps

Good Mornings beautiful peoples :)
I know today is Friday and not Tuesday!
So what am I doing here sharing a creation with
Inspired Stamps

Well ... as part of the Inspired Stamps 12 weeks of Christmas post specials,
this week it is my turn! - Lucky you!

So today I am going to share with you how I make my Chirstmas Bon Bons!

Now these are super easy to make!
No Fuss & NO CUT!
You will be making crackers in no time with this method and ...
I think they look pretty fabulous too!
Wanna see what cha going to make ?


I may be a little bit biased but I think they look 'oh la la!'
And I know they not only look better than the store brought ones, 
 but they also have some yummy goodies inside!

So ... I am here to tell you the how to ...
So lets get cracking! (ha ha .. corny but cute! )

You will need -
(to make as per the example)
Inspired StampsVintage Christmas Set & Sing for Joy Set
Bon bon snaps
Empty toilet roll(s)
Paper – the thinner / lighter the better – Cut to size of 13.5cm x 30cm - (As toilet roll sizes can vary slightly, I suggest you cut a test stripe on waste paper and ensure the 13.5cm length will comfortably fit around your roll with a slight overlap – If necessary add on a few extra centimeters to allow for your roll.)
Double sided adhesive
Ribbon
Lace
Treats to go inside the bon bon(s) – small chocolate(s), party hat, joke ect
Versamark Ink Pad
White Embossing Powder
Heat gun

Now the How To -
1. Firstly you have to decorate your bon bon paper as you desire – For this tutorial I have used plain brown paper, Versmark ink & white embossing powder; & I am going to use the emboss resist technique to ‘age’ my bon bon. - We all know me; I love the vintage / shabby chic look.

2. Along both the shorter edges I have stamped the music staff from the Sing for Joy set, & in the middle of my bon bon I have stamped the Shepherds from the Vintage Christmas Set. I have then sprinkled over some white embossing powder and heat set it. To achieve the ‘aged’ look I have taken Tim Holtz Vintage Photo Distress ink and sponged over and around the embossed area, focusing on darkening the edges and getting lighter towards the middle & for the shepherds, darker in the middle and getting lighter as you get further out.

3. On the reverse side of you paper, run a strip of double sided adhesive all the way along one of the long edges. Take a toilet roll & a bon bon snap & center the snap in the middle of the roll (you can use a little sticky tape and tack it down if you would like). Stuff your bon bon tube – In mine I like to include 2 Ferrero Rocher chocolates, a party hat & a joke, but it is up to you what you want to throw in yours :)


4. Next we have to roll the bon bon. Take two more of the toilet rolls & add them onto either end of your stuffed bon bon & center in the middle of your paper. Placing the two other bon bons makes rolling the bon bon together very easy! Remove the strip of double sided adhesive & roll your bon bon together.


5. Next we have to ‘twist the ends’, to do this, partly remove both of the end toilet rolls (I pull about 4cm of mine out), then holding the middle bon bon roll in your left hand & the partly exposed roll in your right, twist – this will ‘scrunch’ & close your bon bon. Turn the bon bon around & do the same for the other end.


6. Next we have to tie off the bon bon so it doesn’t fall apart – The tighter the tie, the sturdier your bon bon will be. To do this, I get my diary & my stamp cleaner pad & squish the bon bon between the two (any thick heavy book(s) will work). Take your ribbon around the ‘squished’ part & tie tight in a knot. Do this for both ends, then remove your toilet rolls from the ends.


7. Lastly to finish off my bon bons, I like to add some lace around the inner ends. I just adhere some double sided tape to some lace & adhere it to the inside ends. Tidy up your ribbon ends, if any of your bon bon snap is exposed or poking out from the ends, give them a little snip and .....
wella ...
One bon bon ready for the Christmas table :)

See I told you these were SUPER EASY! 
And with just 4 more days till Christmas, 
you got plenty of time to make some of these up! 
With Christmas just about on our doorstep this is sadly the last feature post of 12 for the 12 weeks of Christmas with Inspired Stamps.
If you have missed any of the previous weeks post they are also available at the
The girls have shared some spectacular tutorials over the weeks!
So there is plenty of inspiration & ideas!
And lastly before I go,
Antoinette, the Inspired Stamps DT girls and myself
would all like to wish you
A Merry Christmas & 
A Safe & Happy New Year

Recipe -
Stamp(s) - Inspired Stamps - Vintage Christmas Set & Sing for Joy Set
Paper(s) - Brown paper
Embellishment(s) -white embossing powder, versamark, bon bon snaps Stash - Ribbon, lace.
- - - - - - - - -